How to Wax Wooden Floors Using Several Different Types of Wax
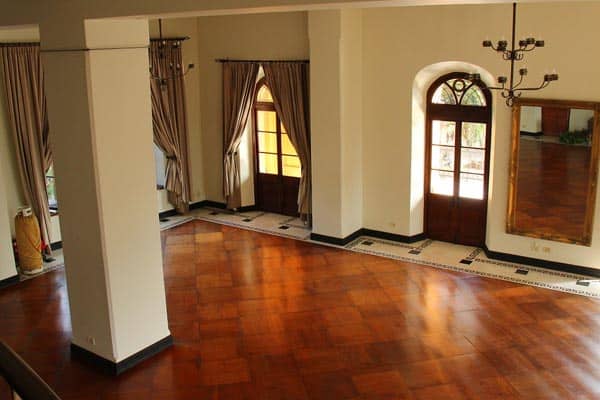
Hardwood floors add an effortless classic elegance to your home, but they can get dirty, dull, scuffed, and dingy as time goes on and you walk over them.
Fortunately for you, waxing your hardwood flooring is an economical and straightforward way to restore them to their gleaming glory and help prolong their lifespan for years.
How to Wax Wooden Floors
The first thing you have to do when you wax wood floors is choose a wax style from solid, liquid, or moisture-based, get your supplies, prepare the surface, wax and buff it. Repeating this process once or twice a year will add a layer of protection to your flooring and make them gleam and shine day in and day out.
But, how do you wax hardwood floors, why wax them, and what steps are involved in the process? After all, this sounds like a time-consuming process, and you don’t want to wreck your hardwood floors. This quick guide will outline the entire process for you.
Why It’s a Good Idea to Wax Hardwood Floors
Waxing the floor is a finishing technique in which you apply colored or clear wax, made with a mix of synthetic or natural waxes and solvents.
You apply it to your hardwood floor in a thin layer before buffing it to an attractive shine. As the solvents start to evaporate, the wax will harden to form a protective seal that offers several benefits, including:
- Boosts beauty
- Increases stain resistance
- Minimizes the look of minor imperfections
- Preserves the flooring’s underlying finish
- Prolongs the floor’s life
You should note that wax will only offer you limited assistance to deeper gouges and dents, and it’ll do very little to ward off bulging or warping from widespread moisture exposure. Wax is a final layer of protection on your hardwood floor.
What Type of Wax You Should Use
Make sure you pick out the appropriate type of wax for your hardwood flooring, including:
- Buffable – Look for a wax that allows you to buff it out after you apply it. Skip any no-buff waxes because dirt can readily cling to them.
- Either Liquid or Solid Paste Wax – Solid paste wax comes with more solvent in it and less wax, and this gives it a thicker consistency that requires you to apply it by hand with a cloth. However, you have to do fewer coats. Liquid wax has more solvent mixed in to give it a thinner consistency, so you have to put multiple coats on with a mop.
- Labeled for Use on Hardwood Floors – Don’t pick out waxes that have labels that dictate that they’re specifically used for furniture. They harden into an extremely slick coat that makes it easy to slip.
- Solvent-Based – Avoid acrylic or water-based waxes on your hardwood floors because they can cause your floors to take on a white tinge. It can also damage unfinished hardwood flooring.
Solid Paste Wax
If you want to get the older rustic look of real wood, this wax will work well for it. It’s a good pick if you want to save money and time because it has a short application and drying time while adhering to the floor quickly. It’s also inexpensive, but you’ll need to touch up your floor to keep the shine up.
You should only apply a solid paste wax if the floor has a non-wood surface like concrete or linoleum or if you have unfinished cork or unvarnished hardwood to avoid damage. You’ll pay around $10.00 for a 16-ounce can, and it has a thick consistency to it.
Liquid Wax
Better called oil wax, this is a slightly easier thing to apply because you don’t have to be fastidious when you apply it, and it saves both time and effort on this project.
You can get matte, semi-glossy, and glossy finishes with this wax, and it adheres to the same types of flooring as solid paste wax does.
You can safely apply it on concrete, unvarnished hardwood, unfinished cork, or linoleum while avoiding urethane finished, vinyl, or no-wax flooring.
You’re going to pay around $15.00 for a 32-ounce can, so it’s slightly more cost-effective than other choices.
The liquid has a much thinner consistency to it because it has more solvent in the wax that helps it spread much easier without nearly as much effort as you’d use with solid paste wax.
Moisture-Based Wax
The final type of wax is a water-based silicone with very heavy-duty durability attached to it once you apply it.
It’ll last much longer without needing touch-ups as liquid or solid paste waxes will, and it’ll act like a shield for the floor underneath it to protect it from scratches and scuffs.
You should be aware that this type of wax can leave a white tinge on your floors after you apply it; that’ll be very noticeable on darker floors.
It also releases a volatile scent when you apply it, so it’s a good idea to consider using a professional contractor if you go this way.
It works differently on the floors it adheres to, and it works with vinyl and urethane-finished floors while not working on cork, unsealed hardwood, or linoleum.
Step One – Preparing the Floors
There are a few steps you should take before you put the wax down the floors, and we’ll outline them for you below.
The first thing you have to do is get your tools ready to use to prepare the floor to take the wax. You’ll need a bucket, buffing pads, dust mask, gloves, knee pads, lint-free cloth, polishing brush, putty knife, and a sponge mop.
- Remove the furniture and rugs from the room to store them until you finish the project.
- Strip any old wax that is present by using a soft cloth dipped into a commercial wax stripper or mineral spirits. Work over two-foot sections at a time until you see no more wax residue on the cloth. Get fine-grade steel wool to slough off any stubborn wax build-up, and make sure your ventilation is good.
- Dry mop the floor using a microfiber cloth or vacuum your floor with a dust brush attachment to get rid of any remaining loose dust build-up or wax.
- If the floor still looks dingy when you finish dusting it, use a sponge mop to remove the grime. Work in three-foot sections at a time or pick up a hardwood floor cleaner like Bona. You can make a solution with a gallon of warm water and a quarter-cup of dish soap.
Step Two – Waxing the Floor
How you wax the floor will depend on the type of wax you decided to go with that we outlined above. We’ll outline the steps for each type of wax below so there is no confusion and you don’t accidentally damage your floor.
How to Apply Liquid Wax
- Get a lint-free cloth and dip it into the wax until it has a thin layer on it.
- Rub the wax-dampened cloth on the floor with the grain of the wood to ensure you get an even spread over your entire floor.
- Once you finish covering the entire floor, allow the wax to dry as long as the package recommends.
- Buff the floor with a buffing machine or a dry pad.
- Apply a second thin layer of wax to give your floor a double layer of protection.
- Allow your second layer of wax to dry.
- Buff the floors for a final time to bring out the shine.
How to Apply Solid Paste Wax
- Apply a small amount of wax to cheesecloth or a terry cloth.
- Rub the cloth on your hardwood flooring in a circular motion for patterned hardwood or along the wood grain for wooden planks.
- Allow the wax to dry as the package recommends without touching it.
- Buff the floor with your hands using a buffing machine or a dry pad.
- The hardwood floor should now look new.
How to Apply a Water-Based Silicone Wax
- Get a latex paint pad applicator or a foam brush and apply the water-based silicone wax.
- Rub the wax in the direction of the wood’s grain to enhance the floor’s natural texture.
- Allow the wax to dry as long as the package recommends.
How to Buff Your Hardwood Floor
You can use a towel for solid wax and a sponge mop for liquid wax and glide the sponge mop or towel in two-foot sections over your floor at a time.
Start in the same corner where you originally started working on your floor, and buff it until it gets to the desired luster.
You can speed up the buffing process by getting an electric floor polisher or buffer for a liquid or solid wax. Leave the freshly waxed and buffed floor for eight hours before you put your rugs or furniture back.
How to Keep Your Wax Floors Nice
Even though this doesn’t have to be a huge process, there are a few things you want to do to keep the floors looking like new for months after you wax and buff them. These things include but are not limited to:
- Avoid applying fresh wax before your old coat of wax wears off because over-waxing your hardwood flooring can result in a lot of wax build-up that looks nasty and is difficult to remove.
- Avoid wet-mopping bigger areas of your waxed hardwood flooring with water because it can damage the wood or cloud the wax coat on the floor.
- In between waxing projects, you can buff the floors using the steps we outlined above to fade out superficial imperfections.
- Lay mats or rugs at the foot of any doorways by your waxed flooring to help keep dirt from getting tracked in on it.
- Lift instead of dragging your furniture across your floor to avoid scratches and dents.
- Remove discoloration and stains by working a hardwood floor cleaner into the discolored or stained area with a cloth.
- Re-wax your floors however often the manufacturer recommends. A solid wax coat can last between two and five years, and liquid wax coatings can last between one and two years. If they don’t give an interval, you can wipe a cloth with mineral spirits on it before inspecting it. If there is no white-colored residue, you can re-wax because no wax remains on the floor.
- Dry-mop the waxed floor with a microfiber cloth pad or a vacuum outfitted with a dust brush attachment to keep dust away.
- Wipe up spills as soon as they happen with a damp cloth and wipe the floor dry.
Bottom Line
Waxing your floors with care can help them look their best while reducing the chances of causing damage when you wax them.
We’ve listed several types of wax you can use, how to use each one, and how to buff the floor to make it gleam and shine.